Microsoft Exchange 2013 Disaster Recovery – Step wise Guide
Disaster Recovery is completely based on the particular data which is now available. Through which the users can easily recover an Exchange Server. This information is only available in any of this desired Domain Controller which is reached at the end of the recovery time. Exchange Configuration data is also available on a Domain Controller under the Configuration Partition. Microsoft Exchange 2013 Disaster Recovery cannot be possible when there is only one Exchange Server available which is also a Domain Controller. It is always the best way to have running Exchange Server within the member server. This is only applicable for Exchange Server 2003, 2007, 2010 and 2013 versions. Although the following steps to recover Exchange 2013 is the little bit different, however in this way the concept remains same. Therefore, in the below section, we are going to discuss the multiple prerequisites and the overall procedure to perform Microsoft Exchange 2013 Disaster Recovery.


Before You Begin
There are following prerequisites performed before doing the procedure to restore Exchange 2013 server:
Remember: The account through which we will perform the Recovery should be a part of Domain Admins Group & Enterprise Admins Group along with Exchange Organization Group.
- Functional Level Domain Controller must be reachable
- For recovery, same Server name and Operating system. No need to add machine to the domain
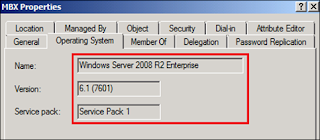
- Need to verify what was the Operating system running on Exchange server before a crash and to check its name.

Must assign the same static IP address.
Follow steps to get IP address:
i. Select any AD Integrated Domain Name Server (DNS) and then, check the hostname of the crashed Exchange server.
ii. Also, note the IP address and to assign the common address.
Same drive letters should be mandatory. Otherwise, Microsoft Exchange 2013 Disaster Recovery will be failed.
Below steps to get drive letters from the crashed server such as:
i. Now, click on the properties of “Mailbox Database 1679725872”
ii. Make a record of the attribute value for the drive letters which have the database as well as log file path. The following log file path are msExchEDBFile, msExchESEParamLogFilePath, msExchESEParamSystemPath.
Some attributes have the database and log file path too.
Note: Must have the knowledge related to ADSIEDIT tool. In case, if an individual does not have the basic understanding on how the software work then, he cannot perform the same.
- Before adding a server to the specific Domain. Select the Active Directory Users And Computers and right click on the crashed server then, choosing the 'Reset Account' as shown below.

- Once the Account has been reset then, we can enable to join the same Exchange server to the particular domain.
- Now, we have already added the source machine to the domain. For this, to verify if Exchange information has available on Domain. To verify that login to the specific domain controller and open the ADSIEDIT tool
Steps How ADSIEDIT tool works on Microsoft Exchange 2013 Disaster Recovery?
- To open the ADSIEDIT and go to Start option
- Next, choose the Administrative Tools and click on ADSIEDIT
- Under the console, right click on the ADSIEDIT and choose Connect To then, selecting a well Known Naming Context.
- From the drop-down menu, choose the Configuration
- In the below image, the DN of the Exchange server object has got crashed:

Before accessing the disaster recovery, open the Windows Powershell and must enter the following command.

Steps for Microsoft Exchange 2013 Disaster Recovery
1. First, Download & Install the Exchange Server 2013 and save it to the local drive.
2. Now, you can Open the Windows Powershell and enter the below script on the command prompt.
3. Next, recover the exchange server by using below commands

4. After this, to configure all the prerequisites

5. Finally, the setup has been completed successfully
Disaster Recovery has finished and now finally to get the Mailbox database in a proper location. Restore the database and mount the desired store.
1. In Exchange Admin Centre, selecting the Mount Database as shown below

2. Now, each email are restored and the users are enabled to send/receive all emails properly

Most Important Things to Remember
- To take the accurate backup of Exchange Database Files should be mandatory.
- It is simple and easy to restore the server if it is a member server
- Active Directory must be healthy, which helps to do Microsoft Exchange 2013 Disaster Recovery faster
Alternate Solution to For Exchange Disaster Recovery
After considering various shortcomings of the manual approach, most of the users search for a reliable and trustworthy solution, which can easily recover and export exchange 2013 mailbox. One such solution is Exchange Database Recovery Software that helps to recover Exchange mailboxes without any data loss. It is programmed in a convenient manner so that users can trasfer their all mailboxes in PST format.
Conclusion
To recover the lost Exchange server 2013, first, users need to know the prerequisites related to the Server. There are some necessary points help to restore the data back as discussed in above section. Also, mentioned the PowerShell commands, which allows recovering the crashed data items in a proper way. The last section of the content explains the complete procedure for Microsoft Exchange 2013 Disaster Recovery.
Comments
Post a Comment